My Dogs and Litters User Guide

Manage Dogs
My Dogs – Manage Dogs
- Managing Your Dogs
- Adding a Dog
- Displaying Dogs in List Based On Selected Criteria
- Selecting and Performing an Action for a Dog(s)
- Selecting and Removing a Dog(s) of Interest from the List
- Selecting and Making a Dog Active
- Selecting and Making a Dog Inactive
- Viewing Breeder Records Using Actions
- Selecting and Printing Dog and Breeder Records
- Selecting and Creating Entry Forms
- Viewing and Updating the Details about a Dog
My Dogs – Manage Dogs
I. Managing Your Dogs
You can manage a list of AKC-registered dogs using the My Dogs section of your My AKC account. The list may contain dogs previously or currently owned and dogs of interest that you do not own. You may want to maintain a list of dogs of interest that you use for breeding or entering AKC events.
The Manage Dogs page allows you to add a dog to the list, view dog information, such as birth litter, ownership, and title & points, and display dogs based on specified criteria. You can also make dogs active, inactive, remove dogs of interest, select dogs based on specified criteria and sort your display. If you have signed up for Online Record Keeping, you can also maintain dog records from Manage Dogs and breeder records from Breeder Records.The list of dogs on the Manage Dogs page allows you to view the dog’s name, breed, sex, dog information, litter of origin, ownership, titles & points. Using the column headers, you can sort the dogs in the list. To sort the information, click the column header and it will sort in ascending or descending order depending on the current order. To view the dog’s information click on the dog and the dog details appear in the tabs below; however, the information you can view depends on if and when you owned the dog or the dog’s litter.
TIP: Throughout the lesson, steps may be marked Optional Steps. You may not always need to perform an Optional Step; however, there may be some cases when information may display differently depending on the dog, owner, or account, which may require you to perform an optional step before continuing.
To begin managing and viewing your dogs:
- Click the Manage Dogs hyperlink under My Dogs in the left hand pane of the window, which will display the My Dogs – Manage Dogs page.
A. Adding a Dog
Under the display list box on the Manage Dogs page, there is an Add a Dog hyperlink. Before you can add a dog, you need the dog’s registration number. If you are adding a Dog I Own, you also need the dog’s certificate issue date.
There are two ways to add a dog; by Registration # and by Name and Breed.
To begin adding a dog by registration number:
- Optional Step: Click the Manage Dogs hyperlink under My Dogs in the left hand pane of the window, which displays the My Dogs and Litters – Manage Dogs page.
- Click the Add a Dog hyperlink under the Display list box.
NOTE: If you are in Online Record Keeping (ORKS), you can also add a dog from the hyperlinks available in certain screens where you select a dam or sire from your list. - Click the Add Dog By Registration Number option.
- Click in the Registration text box and then type the dog registration number.
- Click the Next button, which displays the dog’s information and the ability to decide what type of relationship you have to the dog.
- Click either the Add a Dog I Own option OR the Add a Dog of Interest option.
- Click the Next button. If this was a dog of interest, the dog is added to the list and you can skip to Step 9. If this is a dog you own, proceed to Step 8.
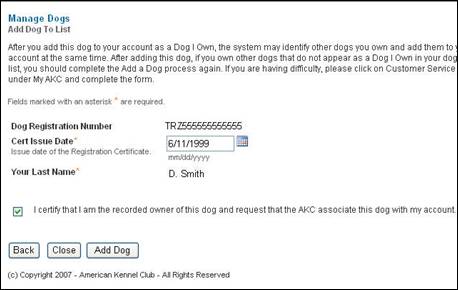
- Click in the Cert Issue Date text box, click the I certify that I am the recorded owner of this dog and request that the AKC associate this dog with my account checkbox, as shown in Figure 1, and then click the Add Dog button.
- Click the Continue button, which confirms the addition and closes the window.
The system will add the dog entered into your account. If this is a Dog I Own, the system may recognize other dogs you own as well, and add them to your account at the same time. After adding this dog, if you own other dogs that do not appear as a Dog I Own in your dog list, simply complete the Add a Dog process again.
To begin adding a dog by name and breed:
- Optional Step: Click the Manage Dogs hyperlink under My Dogs in the left hand pane of the window, which displays the My Dogs and Litters – Manage Dogs page.
- Click the Add a Dog hyperlink under the Display list box.
- Click the Add a Dog By Name and Breed option.
- Click in the Dog Name text box and then type part of or an entire name.
- Click the Breed down-arrow and then select a breed, as shown in Figure 2.
- Click the Next button, which displays the search results based on the data.
- Click the option next to the search result item that matches the dog you wish to add to your dog list.
- Click the Next button, which displays the dog’s information and the ability to decide what type of relationship you have to the dog.
- Click either the Add a Dog I Own option OR the Add a Dog of Interest option.
- Click the Next button. If this was a dog of interest, the dog is added to the list and you can skip to Step 12. If this is a dog you have or currently own, go to Step 11.
- Click in the Cert Issue Date text box, click the I certify that I am the recorded owner of this dog and request that the AKC associate this dog with my account checkbox, and then click the Add Dog button.
- Click the Continue button, which confirms the addition and closes the window.
The system will add the dog entered into your account. If this is a Dog I Own, the system may recognize other dogs you own as well, and add them to your account at the same time. After adding this dog, if you own other dogs that do not appear as a Dog I Own in your dog list, simply complete the Add a Dog process again.
NOTE: If there is not a dog available based on the search entered, a message displays stating: The dog you entered could not be added to your account because it could not be found in our database. Please check the information you entered or contact Customer Service if this problem persists.
back to top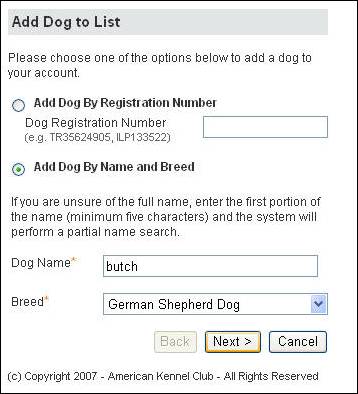
B. Displaying Dogs in List Based On Selected Criteria
The dogs in your list can be sorted and displayed based on the following criteria:
- All My Dogs – All of the dogs in your list display on the page.
- Dogs I Used to Own – Only dogs that you used to own, but do not currently own, display.
- Dogs I Currently Own – All dogs that you currently own display.
- Dogs of Interest – All dogs that you have never owned display.
- Active Dogs – All active dogs display; you may mark any dog in your list as “active”
- Inactive Dogs – All inactive dogs display; you may mark any dog in your list as “inactive”
NOTE: If no dogs fit the selected criteria, a message displays stating “No dogs currently displayed”. To show dogs, please change your Display option or use the Add a Dog hyperlink to add dogs to your list.
To display dogs:
- Optional Step: Click the Manage Dogs hyperlink under My Dogs in the left hand pane of the window, which displays the My Dogs and Litters - Manage Dogs page.
- Click the Display down-arrow, which shows a list of choices.
- Click one of the following choices: All My Dogs/Dogs I Used to Own/Dogs I Currently Own/Dogs Of Interest/Active Dogs/Inactive Dogs, as shown in Figure 3, which displays the dogs based on the selected criteria.
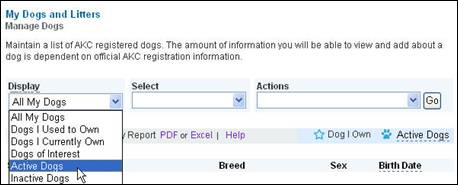
NOTE: You can only select one criteria at a time. If you want to change the category of a dog (ex. make a dog inactive or active, please go to the Selecting and Performing an Action for a Dog(s) section).
back to topC. Selecting and Performing an Action for a Dog(s)
If you wish to perform an action on a dog(s), you must first select a dog or dogs on which to perform the action. You can select a dog several ways:
- Click the checkbox(es) next to the dog(s) on which you wish to perform an action.
- Click the Select down-arrow and then select all your dogs, dogs you own, dogs of interest, dogs you used to own, inactive dogs, or active dogs.
Once you have selected a dog(s), you can remove a dog of interest from your list, make dogs active or inactive, print reports, or be taken to the breeder records area where you can view a list of the selected dogs and view their breeder records.
back to top
I. Selecting and Removing a Dog(s) of Interest from the List
Dogs of interest are the only dogs that you can permanently remove from your list. You can hide owned dogs by changing the display option, but owned dogs cannot be permanently removed. If you have transferred a dog or made a dog inactive, it will always display on your list.
To select and remove a dog of interest:
- Optional Step: Click the Display down-arrow and then click Dogs of Interest.
- Click the Select down-arrow and then click Dogs of Interest, which selects all of the dogs of interest on your list OR click the checkbox next to the dog(s) of interest you wish to remove.
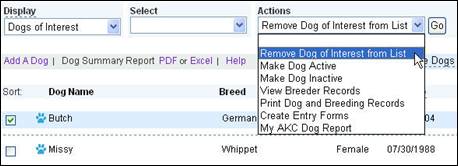
TIP: Dogs of interest do not have a blue star next to their name. - Click Actions down-arrow and then click Remove Dog of Interest from List, as shown in Figure 4.
- Click the Go button, which deletes all of the selected dogs of interest from the list.
II. Selecting and Making a Dog Active
Active dogs are indicated by a blue paw print next to a dog’s name. By default, all dogs you add to your list will be marked active, and will remain active until you mark them inactive.
To select and make a dog active:
- Optional Step: Click the Display down-arrow and then click Inactive Dogs.
- Click the Select down-arrow and then click Inactive Dogs, which selects all of the inactive dogs on your list OR click the checkbox next to the inactive dog(s) you wish to make active.
TIP: Inactive dogs have a gray paw next to them. - Click Actions down-arrow and then click Make Dogs Active.
- Click the Go button, which activates all selected dogs.
NOTE: If your display list box said Inactive Dogs and you made ALL inactive dogs active, it will display a message saying no dogs currently displayed. You will need to click the Display down-arrow and then click either All My Dogs or Active Dogs to view the changes to the list.
III. Selecting and Making a Dog Inactive
To select and make a dog inactive:
- Optional Step: Click the Display down-arrow and then click Active Dogs.
- Click the Select down-arrow and then click Active Dogs, which selects all of the active dogs on your list OR click the checkbox next to the active dog(s) you wish to make inactive.
TIP: Inactive dogs have a gray paw next to them. - Click the Actions down-arrow and then click Make Dogs Inactive.
- Click the Go button, which makes all selected dogs inactive.
NOTE: If your Display list box said Active Dogs and you made ALL active dogs inactive, it will display a message saying no dogs currently displayed. You will need to click the Display down-arrow and then click either All My Dogs or Inactive Dogs to view the changes to the list.
IV. Viewing Breeder Records Using Actions
NOTE: If you select a dog that has not been involved in a mating and/or produced a litter, the record will not display.
To begin viewing breeder records:
- Optional Step: Click the checkbox next to the dog(s) for which you wish to view the breeder records OR click the Select down-arrow and then select a group of dogs.
- Click the Actions down-arrow and then click View Breeder Records.
- Click the Go button, which displays the My Records – Breeder Records page.
V. Selecting and Printing Dog and Breeder Records
You can print dog records, or mating, birth, and litter records. When you print records from the manage dogs section, you will only see mating and litter information if there is a mating (M record) or AKC litter record (L Record) in the breeder records list associated with that dog. If there are 12 L records and only one has an M record, then only that one mating instance is printed. The only way to view mating records is to have an associated M record in the breeder records list.
To begin printing records for a dog:
- Click the checkbox next to the dog(s) for which you wish to view the report(s).
- Click the Actions down-arrow and then click Print Dog Reports.
- Click the Go button, which displays the Report Selection page.
- Click the checkbox next to the report(s) you wish to print and then click the Submit button, which displays a browser window and then PDF of the selected report(s).
NOTE: A PDF reader must be installed on your computer to view the document. Your browser must also accept pop-ups. Please click the Technical Support link in the left navigation pane if you have any questions about pop-ups. - Click the Yes button on the message box that appears to close the extra browser window.
- Click the Print on the PDF to have a paper copy of the report OR click Save to keep a copy on the computer.
VI. Selecting and Creating Entry Forms
You can create pre-populated AKC event entry forms using dogs in your dog list. You can select a dog or dogs in your list and the system will pre-populate known information about you and your dog on the form. You can print the form, fill in the remaining information, and mail them to the appropriate address.
To begin printing event reports:
- Click the Manage Dogs hyperlink in the left navigation pane.
- Click the checkbox in front of the dog or dogs for which you wish to create event reports.
- Click the Actions down-arrow, click Create Entry Forms, and then click the Go button, which opens the Event Reports window.
- Click the dog(s) for which you wish to create entries, select the appropriate entry form, and then select the information to display on the report, as shown in Figure 5.
- Click the Submit button to view the entry form for the selected dog(s), which displays a PDF report for the dog.
NOTE: Acrobat reader must be installed on your computer to view the PDF. - Click File>Print to print the report.
- Repeat steps 4 - 6 on the Event Reports window until all the dogs’ reports have been printed.

D. Viewing and Updating the Details about a Dog
Once you have a dog on your list, you can view details about that dog by clicking on the dog in the list. The details display basic dog information, litter of origin information for the dog, ownership information, and the dog’s titles and points. If you do not own the dog, you will only be able to view the dog’s information and its titles and points. If you own/lease or used to own/lease the dog, you will be able to view information on the ownership tab and edit the information related to that ownership period. If you own the dog, you may change information that is located on the Dog Information tab about the dog’s identification information. If you change any information on the tabs, the history tab also displays a time/date account of any changes made to this dog’s information.
To being viewing dog details:
- Click a dog in the list.
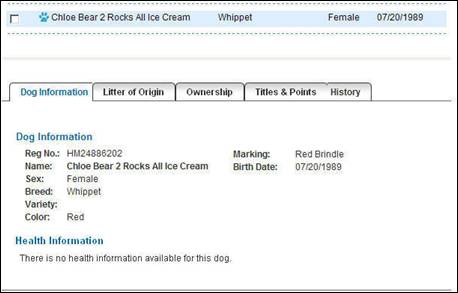
- Click a tab, Dog Information, Litter of Origin, Ownership or Titles & Points, which will display the information or a message depending on your relationship to the selected dog, as shown in Figure 6.
I. Changing and Removing a Dog’s Identification Information
The identification information for a dog can be entered on the Dog Information tab. There are three ID types that can be entered; Tattoo, Microchip, and Collar Tag. There is no limit to the number of identifications that can be entered. If you do not own the dog, you will be unable to enter identification information. The ID cannot exceed 50 characters.
To enter identification information:
- Click a dog for which you wish to view their information.
- Click the Dog Information tab.
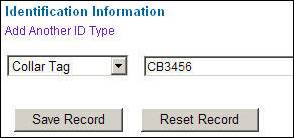
- Click the down-arrow and then click Microchip, Tattoo, or Collar Tag.
- Click in the text field and then type in the appropriate ID information, as shown in Figure 7.
- Click the Save Record button to save the entered information.
NOTE: The information entered in the text field cannot be longer than 25 characters.
NOTE: If you do not want to save the information, click the Cancel Record button. - Optional Step: Click Add Another Id Type and then follow steps 3-5 to create as many ID’s as desired.
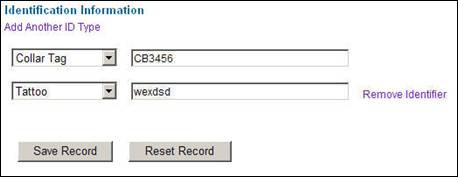
NOTE: To remove an ID, you must have more than one ID saved. Once you have added and saved more than one identifier, click the Remove Identifier hyperlink next to the identifier you wish to remove, as shown in Figure 8.
II. Editing Ownership Information(Creating an AKC Dog Record)
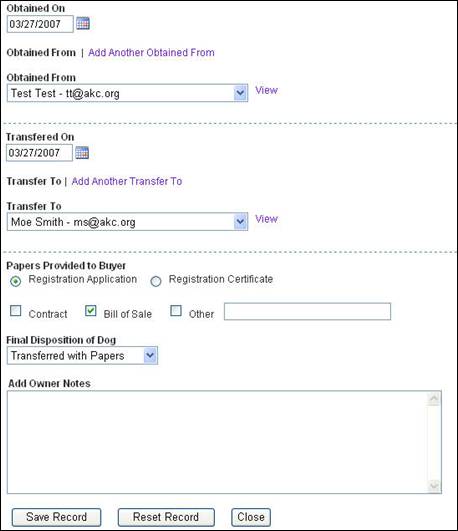
The ownership information details the information about the ownership period for the selected dog, including who you obtained the dog from, and if applicable, who you transferred it to.
To enter ownership information:
- Click the dog for which you wish to view their information.
- Click the Ownership tab.
- Click the Edit Information Below hyperlink to access the ownership period for which you wish to enter the information.
- Click in the Obtained On field and then type in the date OR click the calendar button and then select a date.
- Click the Obtained From down-arrow and then select a contact.
- Optional Step: Click in the Transferred On field and then type in the date OR click the calendar button and then select a date. Click the Transfer To down-arrow and then select a contact. Click the option and/or checkboxes for how papers were provided.
- Optional Step: Click the Final Disposition of Puppy down-arrow and then click select how the puppy was transferred or registered, as shown in Figure 9.
- Click the Save Record button to keep the information OR click Reset Record to restore previous information.
- Optional Step: Click in the Add Owner Notes text box and then enter any comments.
- Click the Close button to view the entered information on the Ownership tab.
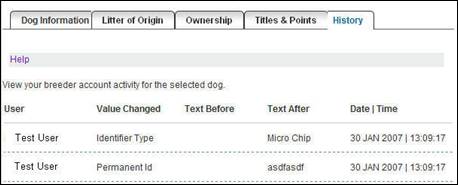
III. Viewing a Dog’s History
The History tab details any changes made to a dog’s detailed information. After you have changed dog information and/or ownership, any changes made are time and date stamped and described on the History tab.
The history tab sometimes indicates that an item has been changed even when no update was made. When you save information, such as ownership information, if you don’t update a field, the history tab indicates a change because it registers that all fields on a page where saved, even if they weren’t updated.
To view history information:
- Click a dog for which you wish to view their information.
- Click the History tab, which displays any change to the account, as shown in Figure 10.