

Club Management

User Guide
I. Understanding, Accessing, and Using Club Management
Club Management allows club officers to assign privileges to other officers, edit other club member information, and grant privileges to manage the club’s events.
NOTE: You cannot manage events in this tool, you can only assign event management privileges.
You can only access club management if you are logged into your authenticated My AKC account. Being a member of a club does not automatically mean you have privileges to update the club information. An officer of the club must send you an access code that enables you to view and update officer information and/or assign events.
If you do not have an access code and you are an officer in a particular club, please contact your club President for access. The AKC sends the initial access code to a club representative (i.e. President or Corresponding Secretary) from which they can create additional access codes. These codes are specific to your club and your account and are different than the My AKC access codes you received when you signed up for a My AKC account.
There are four different types of privileges that you can assign to an officer:
- OE – Officer of the club that can change officer information (such contact, term, and privileges), send out access codes, and assign privileges to manage club events. This is the highest level privilege.
- O – Officer of the club that can change other officer’s contact, term, and privileges as well as send out access codes.
- E – Grant privileges and sends access codes for managing the club’s events.
- N – Unable to modify any club information.
NOTE: Only current officers can manage club information.
back to topA. Logging into My AKC and Accessing Club Tools
You must have a My AKC account to access your Clubs. Also, to access Club Management you must have an access code email providing you with access to that specific club. You can have access to multiple clubs; however, each club will have their own access code. The access code must be used from the code email or entered in your My AKC account before you can view that club’s information.
I. Logging into My AKC
You must login to your My AKC account to access Club Management. If you do not have an account, please create an account at www.akc.org, Follow the instructions in the right My AKC pane by using the Create Account hyperlink.
To login to My AKC:
- Type www.akc.org in your browser’s address book.
- Click in the Enter Account Name text box and then type your account name.
NOTE: If you do not remember your account name, please click the Forgot Account Name? link. - Click in the Enter User Password and then type your password, as shown in Figure 1.
NOTE: If you do not remember your password, please click the Forgot Password? link. - Click the Login button, which logs you into your My AKC account.
NOTE: If you receive a message saying you do not have an account, please create an account or use one of the Forgot links to verify your account information.
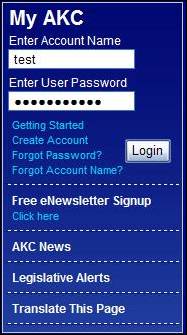
Figure 1. The My AKC Login Information
II. Entering Your Access Code for a Club
You should have received an email with an access code that allows you to automatically validate your access code and then view your club information.
If you clicked on the link in the email and entered your code per the email’s instructions, you do not need to enter a code in your My AKC account; however, if you do not see your club, you can enter the access code under Account Management in your My AKC account. Your clubs will be listed under My Club Tools in the left navigation pane.
To enter the code in your My AKC account:
- Login to your My AKC account.
- Click the My AKC button.
- Click the Account Management link under My Account in the left navigation pane, which displays your account management page.
- Scroll down and then click the Add your Club Role to your account... link under Add Relationships, as shown in Figure 2, which displays the Account Management Access Code page.
- Click in the Access Code text box and then type your code.
- Click the I have read and agree with the terms and use checkbox and then click the Continue button, which displays the My Club page and the My Club Tools in the left navigation, as shown in Figure 3.
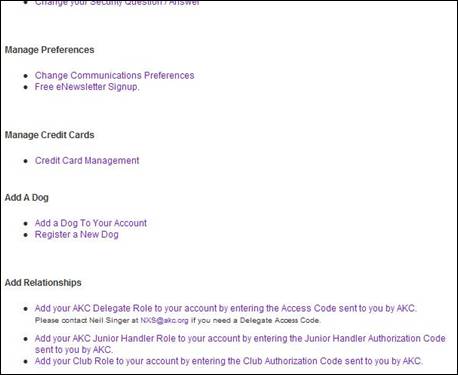
Figure 2. The Account Management Page to Add Relationships
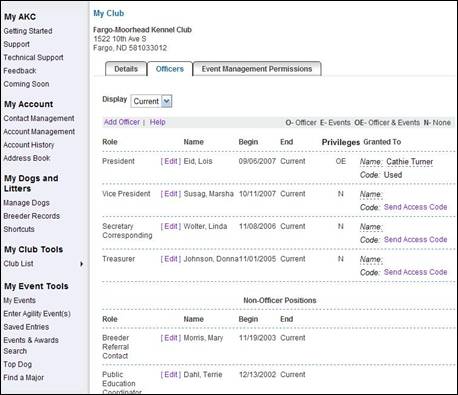
Figure 3. The My Club Page with My Club Tools
B. Understanding and Using the Details Page
The details tab provides information about the club including:
- Club Type
- Club Email Address
- Club Web Site
- Breed
- Competition Type
- Affiliation Level
The only item on the page that is “clickable” is the club’s web address.
To access the details tab:
- Login to your My AKC account.
- Click on Club List under Club Tools, as shown in Figure 4, and then click on the club you wish to access.
- Click on the Details tab.
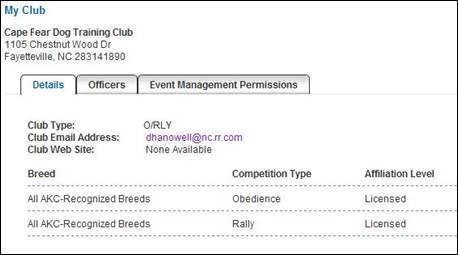
Figure 4. The Details Page
C. Understanding and Using the Officers Page
The officers page allows you to:
- Assign Privileges – OE, O, E, and N.
- Send Access Codes – Send the code to officers who need access to the club information.
- Add Officer – Create a new officer account.
- Edit – Change privilege status, length of term, and contact information for an officer.
NOTE: Once you are on the Officer page, you can change the display of the officers. The default display is current officers; however, you can view the past and future officers by clicking the Display down-arrow and then clicking a new time period.
WARNING: There must be an account with OE privileges.
back to topI. Add An Officer
You can add an officer by creating a new position or you can search for and find an existing officer and then change their position or create a second position for that existing officer.
NOTE: The same person may not hold multiple officer roles at the same time except for the Secretary (Corresponding or Recording) and Treasurer.
To begin adding an officer:
- Login to your My AKC account.
- Click the My AKC button.
- Click on Club List under Club Tools and then click on the club you wish to access.
- Verify that the Officers tab is selected.
- Click the Add Officer hyperlink, which displays the Club Member Search window.
- Add an officer by searching:
- Click in the First name and Last Name text box to search for a specific member OR click in either text box and then type a partial first or last name.
TIP: If you do not know a name on which to search, click the Search button without entering anything in the text boxes to display all the available officers. - Click the Search button, which changes to a Searching button, as shown in Figure 5.
- Click the Select button next to the officer you wish to add, which displays the Permissions and Assignments window.
- Click the down-arrows, select the correct information, and type updated information in the text boxes that relate to this account.
- If you changed the officer’s role, the Officer Assignment Overlap window may display. Click the Accept Changes button to make the role change OR click Reedit to go back to the Permissions and Assignment Changes and then make additional changes.
Warning: If there is a role overlap, you may receive the message The same person may not hold officer roles at the same time except for the Secretary and Treasurer. - Go to Step 7.
- Add an officer using Add New Officer button:
- Click the Add New Officer button, which displays the Permissions and Role Assignments window.
- Click the Role down-arrow and then click on a role.
- Optional Step: Click in the End text box and then type a date OR click on the calendar icon and then select an end date.
- Click the Privileges down-arrow and then select a privilege.
- Click in the Contact Information text boxes, type information and then click the Contact Information down-arrows and then select information.
- Go to Step 7.
- Click the Continue button, which displays the Contact Information Window.
- Click the Close Window button, which adds the new officer to the Officers section.
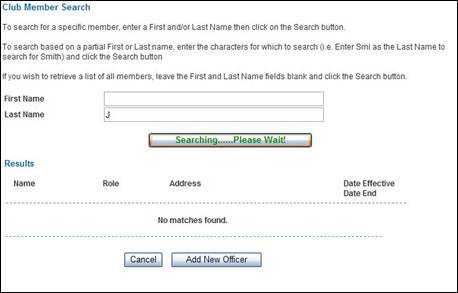
Figure 5. The Search in Progress
II. Edit an Officer
If you have been granted O (officer) or OE (officer & events) privileges, you can update all officer information. You may not grant other officers more privileges that you have been granted. For example, if you have O privileges, you may not grant OE privileges to others.
If you assign a new role to the current officer that is currently occupied, the current role will automatically end if you accept the changes and continue with the update to the selected account.
If the club Specific Address Override is selected for an account, any address changes are changed related to the account; however, the address for the club is where all communication will be sent.
To edit an account:
- Login to your My AKC account.
- Click the My AKC button.
- Click on Club List under Club Tools and then click on the club you wish to access.
- Verify that the Officers tab is selected.
- Click the Edit button next to the officer whose information you wish to update, which displays the Permissions and Role Assignments window.
- Optional Step: Click in the Begin text box and then type a date OR click on the calendar icon and then select an end date.
- Optional Step: Click in the End text box and then type a date OR click on the calendar icon and then select an end date.
- Click the Privileges down-arrow and then select a privilege.
- Optional Step: Click the Assign this role to another officer down-arrow and then click a new role, which will change the current role.
- Click in the Contact Information text boxes, type information and then click the Contact Information down-arrows and then select information, as shown in Figure 6.
- Click the Continue button.
- If you did not change the role to an existing role, the Contact Information Window displays.
- If you changed the role to an existing role, the Officer Assignment Overlap window appears, as shown in Figure 7. Click the Accept Changes and then go to Step 12 OR click the Reedit button, which redisplays the Permissions and Role Assignments window, and follow the steps again until you have updated the officer information.
- Click the Close Window button, which updates the officers information.
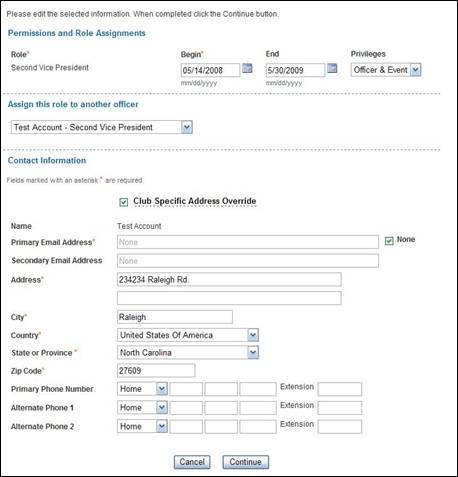
Figure 6. The Officer's Information Being Edited
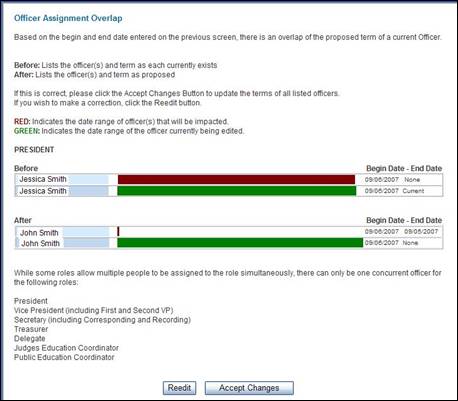
Figure 7. The Officer Roles Overlapping
III. Send or Resend an Access Code
You can send an access code to any officer. Once an access code has been sent but not used, you can resend a new access code until it is used. After the code has been sent and used, it will say “used” next to the account, display the account from which it was used, and you will be unable to send another access code for that role. These access codes expire 90 days after issuance.
To send an access code:
- Login to your My AKC account.
- Click the My AKC button.
- Click on Club List under Club Tools and then click on the club you wish to access.
- Verify that the Officers tab is selected.
- Click the Send Access Code hyperlink next to an account, which displays the Send Access Code window.
- Click in the Email address text box and then type an email.
- Click in the Confirm email address text box and then type the same email, as shown in Figure 8.
- Click the Send button, which emails the account an access code and then updates the officer’s account with a Resend hyperlink, as shown in Figure 9.
NOTE: To resend an access code, click the Resend hyperlink and then follow Steps 6 – 8.
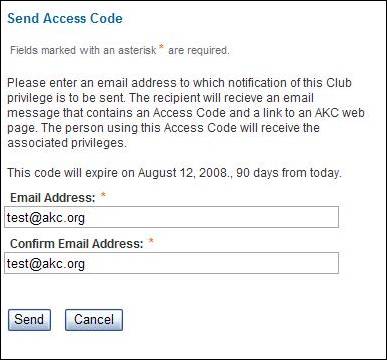
Figure 8. The Access Code Will Be Sent to Entered Address
Figure 9. The Address Code Sent -- Ability To Resend
D. Understanding and Using Event Management Permissions
The Event Management Permissions page enables the officers of the club to grant permission to one or several officers, members, or non-members to manage event(s).
To being granting permissions to manage event(s):
- Login to your My AKC account.
- Click the My AKC button.
- Click on Club List under Club Tools and then click on the club you wish to access.
- Click the Event Management Permissions tab.
- Click the Add Privilege hyperlink, which displays the Send Access Code window.
- Click in the Email address text box and then type an email.
- Click in the Confirm email address text box and then type the same email, as shown in Figure 8.
- Click the Send button, which emails the account an access code and then updates the Privilege Granted To with a Resend hyperlink, as shown in Figure 10.
- Click the checkboxes next to the access code to which you wish to grant event access.
- Click the Save button to grant event access to that access code, as shown in Figure 10.
NOTE: You can also click the Reset button to remove all the checks.
NOTE: To resend an access code, click the Resend hyperlink and then follow Steps 6 – 8.
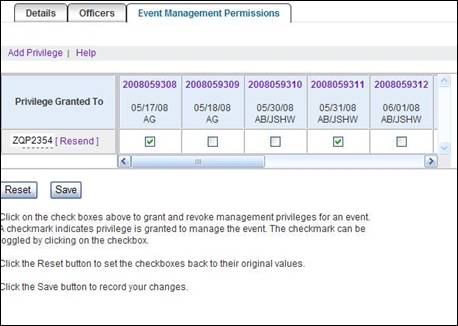
Figure 10. The Privilege to Events Granted to Event Management